Introduction
This tutorial covers some of the nuances involved in setting up GPU passthrough with libvirt and KVM using unsupported graphics cards (namely GeForce®). The documentation contained herein is primarily sourced from personal experience and research into the topic. Any external sources will be denoted using a superscript that links to the source. Anyone is welcome to contribute to this project if they feel that they can do so.
For the purposes of this tutorial, I’m using an ASRock® H97M Anniversary motherboard paired with an Intel® Xeon® E3-1246 v3. The graphics card that I’m using is a ZOTAC GeForce® GTX 1060 Mini (vBIOS ROM). All snippets will be in context of Ubuntu 18.04.1 LTS Server.
Since I don’t have any compatible AMD®-based hardware for testing, I can only provide in-depth support for Intel®-based builds. However, the steps outlined in this publication should very accurately reflect the workflow required for AMD®-based systems.
This tutorial is available in ePUB format.
License
Copyright © 2019 Clay Freeman.
Permission is granted to copy, distribute and/or modify this document under the terms of the GNU Free Documentation License, Version 1.3 or any later version published by the Free Software Foundation; with no Invariant Sections, no Front-Cover Texts, and no Back-Cover Texts. A copy of the license can be found in the file named “LICENSE.md” included with this project.
Table of Contents
- Introduction
- License
- Preamble
- Hardware Compatibility criteria
- Preparing the Hypervisor
- Preparing the Virtual Machine
- Booting the Virtual Machine
- Conclusion
- Glossary
Preamble
The goal of this tutorial is to set up a hypervisor environment capable of GPU passthrough of an unsupported graphics card to a UEFI-based Microsoft® Windows® 10 installation inside a virtual machine. This tutorial assumes that the would-be hypervisor’s operating system and libvirt/KVM have already been installed.
A cardinal sub-objective of this tutorial is to make all custom configuration with the intent that it cannot be easily subjected to clobbering by any system services or utilities on the hypervisor.
Also of great importance to this tutorial is to provide the reader (you) with ample information to understand the changes that are made and why they need to be made.
Several quirks will present themselves during configuration and each one must be overcome in order to complete all of our stated goals:
- The graphics card will be utilized by the hypervisor to display its operating system console by default. This will block any attempt to detatch the graphics card from the hypervisor and subsequently attach it to the virtual machine. In order to fix this issue, the graphics card’s hardware ID pair must be blacklisted on the hypervisor so that it will be unused until it is attached to the virtual machine.
- Now that the graphics card has been blacklisted, how will the hypervisor display its operating system console? We will need to make sure that the device blacklisting process does not adversely affect the use of any secondary graphics card to be used by the hypervisor. In order to satisfy this constraint, it is recommended at the very least to have a graphics solution with a different hardware identifier. Integrated graphics is a great bang-for-the-buck option.
- The graphics card’s ROM image will become tainted after successive initialization(s), preventing clean restarts of the virtual machine. This can be fixed by performing a clean reboot of the hypervisor after the target device has been blacklisted and imaging its ROM to a file before first use. The resulting image will be loaded in the virtual machine instead of mapping the ROM directly from the device.
- The drivers for the unsupported graphics card will report an error (Code 43) when booting the guest operating system. This must be overcome by masquerading the hardware of the virtual machine to match the host computer as closely as possible so that the graphics card’s drivers do not suspect that the guest operating system is being virtualized.
This tutorial encourages feedback! If you notice any missing steps or information, or just find that the tutorial can be generally made better, please open an issue.
An example libvirt domain can be found at resources/example-domain.xml.
Hardware Compatibility Criteria
Below are some things to keep in mind while planning your build. At a minimum, your hardware must meet all criteria with bold text. Other criteria are just recommendations to make the configuration process easier.
- Your graphics card must have a UEFI-compatible vBIOS. Most modern GPUs (~2012 onward) will have this.[ArchWiki]
- If you’re using an AMD®-based system, your motherboard and CPU must support AMD® Virtualization Technology (AMD-V™) and AMD® I/O Virtualization Technology (IOMMU) (also known as “AMD-Vi”).
- If you’re using an Intel®-based system, your motherboard and CPU must support Intel® Virtualization Technology (VT-x) and Intel® Virtualization Technology for Directed I/O (VT-d).
- It is recommended that your motherboard and CPU also support integrated graphics. The hypervisor will need a way to display the console and the cheapest way to do this is to ensure that you have integrated graphics support. The alternative to this would be having a separate discrete GPU (if you have an available PCI-e slot).
With all of this in mind, the issue of IOMMU group isolation may still remain; if some or all of your motherboard’s PCI-e ports are too tightly associated with other system components, you may have difficulty using PCI-e passthrough. Due to the way PCI-e passthrough works, you have to attach each device in a given IOMMU group containing the desired device. This will be explained later in more detail.
Preparing the Hypervisor
The first step to facilitating PCI-e passthrough of any kind is enabling virtualization acceleration and IOMMU in your motherboard’s BIOS settings. Consult your motherboard manual to find options relating to AMD-V™, AMD-Vi, VT-d, VT-x or anything else with virtualization-related keywords and enable those options.
Next, we need to enable support for IOMMU in the Linux kernel. Assuming that you
use GRUB as your boot loader, we need to append one of the following strings to
the GRUB_CMDLINE_LINUX_DEFAULT variable in /etc/default/grub, making sure
that there is a space to separate it from what’s already there:
- If using an AMD®-based system, append
amd_iommu=onto the kernel argument list. - If using an Intel®-based system, append
intel_iommu=onto the kernel argument list.
Once you’ve modified the variable, it should look similar to this:
GRUB_CMDLINE_LINUX_DEFAULT="quiet splash intel_iommu=on"
Note: If your device(s) don’t support interrupt remapping, you might be able to
quell any issues with PCI-e passthrough by adding
vfio_iommu_type1.allow_unsafe_interrupts=1 to the argument list as
well. There are some security concerns that you should research first before
enabling unsafe interrupts.[Red Hat]
Finally, run the following command to update your boot loader configuration:
$ update-grub
Generating grub configuration file ...
Found linux image: /boot/vmlinuz-x.xx.x-xx-generic
Found initrd image: /boot/initrd.img-x.xx.x-xx-generic
done
Once your boot loader configuration is updated, reboot your system. To verify that your operating system is configured correctly for PCI-e passthrough, run the following commands and make sure that your output is similar:
$ apt-get install -y cpu-checker
$ kvm-ok
INFO: /dev/kvm exists
KVM acceleration can be used
$ dmesg | egrep 'DMAR|IOMMU'
[    0.000000] ACPI: DMAR 0x00000000BD6483E0 0000B8 (v01 INTEL  BDW      00000001 INTL 00000001)
[    0.000000] DMAR: IOMMU enabled
[    0.000000] DMAR: Host address width 39
[    0.000000] DMAR: DRHD base: 0x000000fed90000 flags: 0x0
[    0.000000] DMAR: dmar0: reg_base_addr fed90000 ver 1:0 cap c0000020660462 ecap f0101a
[    0.000000] DMAR: DRHD base: 0x000000fed91000 flags: 0x1
[    0.000000] DMAR: dmar1: reg_base_addr fed91000 ver 1:0 cap d2008c20660462 ecap f010da
[    0.000000] DMAR: RMRR base: 0x000000bdea5000 end: 0x000000bdeb3fff
[    0.000000] DMAR: RMRR base: 0x000000bf000000 end: 0x000000cf1fffff
[    0.000000] DMAR-IR: IOAPIC id 8 under DRHD base  0xfed91000 IOMMU 1
[    0.000000] DMAR-IR: HPET id 0 under DRHD base 0xfed91000
[    0.000000] DMAR-IR: x2apic is disabled because BIOS sets x2apic opt out bit.
[    0.000000] DMAR-IR: Use 'intremap=no_x2apic_optout' to override the BIOS setting.
[    0.000000] DMAR-IR: Enabled IRQ remapping in xapic mode
[    0.700747] DMAR: No ATSR found
[    0.700776] DMAR: dmar0: Using Queued invalidation
[    0.700782] DMAR: dmar1: Using Queued invalidation
[    0.700828] DMAR: Setting RMRR:
[    0.700883] DMAR: Setting identity map for device 0000:00:02.0 [0xbf000000 - 0xcf1fffff]
[    0.702040] DMAR: Setting identity map for device 0000:00:14.0 [0xbdea5000 - 0xbdeb3fff]
[    0.702083] DMAR: Setting identity map for device 0000:00:1a.0 [0xbdea5000 - 0xbdeb3fff]
[    0.702128] DMAR: Setting identity map for device 0000:00:1d.0 [0xbdea5000 - 0xbdeb3fff]
[    0.702141] DMAR: Prepare 0-16MiB unity mapping for LPC
[    0.702174] DMAR: Setting identity map for device 0000:00:1f.0 [0x0 - 0xffffff]
[    0.702290] DMAR: Intel(R) Virtualization Technology for Directed I/O
[    1.146736] [drm] DMAR active, disabling use of stolen memory
Note: you may get more or less lines here; just look for hints that IOMMU is actually enabled.
Blacklisting the GPU
After preparing the hypervisor’s hardware and kernel, we need to take steps to locate and blacklist all passthrough devices in the hypervisor’s kernel.
Before blacklisting the GPU in the hypervisor’s kernel, make sure that a secondary graphics device is installed with a different hardware identifier, whether integrated or discrete, so that the hypervisor can still display its operating system’s console.
Locating the GPU
Create a file named iommu_groups.sh and place the following contents in it.
This script will be used to enumerate the IOMMU groups for your
system.[ArchWiki]
#!/bin/bash
shopt -s nullglob
for d in /sys/kernel/iommu_groups/*/devices/*; do
  n=${d#*/iommu_groups/*}; n=${n%%/*}
  printf 'IOMMU Group %s ' "$n"
  lspci -nns "${d##*/}"
done;
Execute the script and locate the group(s) containing your target device(s):
$ bash iommu_groups.sh
[...]
IOMMU Group 1 00:01.0 PCI bridge [0604]: Intel Corporation Xeon E3-1200 v3/4th Gen Core Processor PCI Express x16 Controller [8086:0c01] (rev 06)
IOMMU Group 1 01:00.0 VGA compatible controller [0300]: NVIDIA Corporation GP106 [GeForce GTX 1060 6GB] [10de:1c03] (rev a1)
IOMMU Group 1 01:00.1 Audio device [0403]: NVIDIA Corporation GP106 High Definition Audio Controller [10de:10f1] (rev a1)
[...]
The output of this script will consist of three noteworthy columns of data for each PCI-e device in your system:
- The IOMMU group to which the given device belongs.
- The BDF identifier of the given device.
- The hardware identifier of the given device (near the end between square brackets).
In the case of our example GPU, we want to pass through the devices with BDF
identifiers 01:00.0 and 01:00.1, the GPU and its associated audio controller
for DisplayPort™ and HDMI™.
In the event that your target device(s) share a group with any other devices, you must passthrough those devices to the virtual machine as well (excluding any “PCI bridge” devices which are part of the CPU). If this is not a problem for your use case, then you can proceed without issue. If you need to further split the IOMMU group, then you may need to look into the ACS Override Patch which is not covered as part of this tutorial.
Once you’ve identified the IOMMU group(s) and all of their constituent devices
that must be attached to the virtual machine, take note of each of their
hardware IDs reported by our script. For example, our list will include
10de:1c03 and 10de:10f1, excluding the PCI bridge since it is not necessary
to passthrough to the virtual machine. This list of devices is referred to as
the set of passthrough devices.
Create artificial hypervisor driver dependencies
Before we can create a stub device on the hypervisor for your passthrough
devices, we need to determine how the vfio-pci kernel module will be loaded on
your system. Run the following command on the hypervisor:
grep vfio-pci /lib/modules/"$(uname -r)"/modules.builtin || echo CONFIG_VFIO_PCI=m
If the above command outputs CONFIG_VFIO_PCI=m, then we will need to create a
file at /etc/modprobe.d/01-vfio-pci.conf to create an artificial dependency on
vfio-pci for all applicable kernel modules (drivers) for our passthrough
devices. Otherwise, you should skip to the next step.
First, run the following command for each passthrough device, replacing the example BDF identifiers with your real BDF identifiers:
$ lspci -vs 01:00.0
01:00.0 VGA compatible controller: NVIDIA Corporation GP106 [GeForce GTX 1060 6GB] (rev a1) (prog-if 00 [VGA controller])
  Subsystem: ZOTAC International (MCO) Ltd. GP106 [GeForce GTX 1060 6GB]
  Flags: fast devsel, IRQ 255
  Memory at f6000000 (32-bit, non-prefetchable) [size=16M]
  Memory at e0000000 (64-bit, prefetchable) [size=256M]
  Memory at f0000000 (64-bit, prefetchable) [size=32M]
  I/O ports at e000 [size=128]
  Expansion ROM at f7000000 [disabled] [size=512K]
  Capabilities: [60] Power Management version 3
  Capabilities: [68] MSI: Enable- Count=1/1 Maskable- 64bit+
  Capabilities: [78] Express Legacy Endpoint, MSI 00
  Capabilities: [100] Virtual Channel
  Capabilities: [250] Latency Tolerance Reporting
  Capabilities: [128] Power Budgeting <?>
  Capabilities: [420] Advanced Error Reporting
  Capabilities: [600] Vendor Specific Information: ID=0001 Rev=1 Len=024 <?>
  Capabilities: [900] #19
  Kernel driver in use: nouveau
  Kernel modules: nvidiafb, nouveau

$ lspci -vs 01:00.1
01:00.1 Audio device: NVIDIA Corporation GP106 High Definition Audio Controller (rev a1)
  Subsystem: ZOTAC International (MCO) Ltd. GP106 High Definition Audio Controller
  Flags: fast devsel, IRQ 255
  Memory at f7080000 (32-bit, non-prefetchable) [disabled] [size=16K]
  Capabilities: [60] Power Management version 3
  Capabilities: [68] MSI: Enable- Count=1/1 Maskable- 64bit+
  Capabilities: [78] Express Endpoint, MSI 00
  Capabilities: [100] Advanced Error Reporting
  Kernel driver in use: snd_hda_intel
  Kernel modules: snd_hda_intel
Create a list of modules that appear on the “Kernel modules:” line of each
passthrough device. For each kernel module in the list, add a line to
/etc/modprobe.d/01-vfio-pci.conf using the following format (replace
“nouveau” with the name of the kernel module exactly as it appears in the output
of the above command):
softdep nouveau pre: vfio-pci
The resulting /etc/modprobe.d/01-vfio-pci.conf file should look similar to the
following example (differing based on the list of kernel modules for which you
need to create dependencies):
softdep nouveau pre: vfio-pci
softdep nvidiafb pre: vfio-pci
softdep snd_hda_intel pre: vfio-pci
Creating a stub for the GPU
Next, we need to update the kernel command line to configure vfio-pci to
consume each passthrough device to prevent it from being used by the hypervisor.
If using GRUB, add another argument to GRUB_CMDLINE_LINUX_DEFAULT in
/etc/default/grub in the following format (where PLACEHOLDER should be
replaced with a comma-separated list of hardware IDs for your passthrough
devices):
vfio_pci.ids=PLACEHOLDER
Once you modify this variable, it should look similar to the following example:
GRUB_CMDLINE_LINUX_DEFAULT="quiet splash intel_iommu=on vfio_pci.ids=10de:1c03,10de:10f1"
Finally, run the following commands (in the listed order) and reboot the hypervisor yet again:
$ update-initramfs -u
update-initramfs: Generating /boot/initrd.img-x.xx.x-xx-generic
$ update-grub
Generating grub configuration file ...
Found linux image: /boot/vmlinuz-x.xx.x-xx-generic
Found initrd image: /boot/initrd.img-x.xx.x-xx-generic
done
After the hypervisor reboots, check that each required device was consumed by
the vfio-pci kernel module. You should see vfio-pci on the line starting
with “Kernel driver in use:” for each passthrough device:
$ lspci -vs 01:00.0
01:00.0 VGA compatible controller: NVIDIA Corporation GP106 [GeForce GTX 1060 6GB] (rev a1) (prog-if 00 [VGA controller])
  Subsystem: ZOTAC International (MCO) Ltd. GP106 [GeForce GTX 1060 6GB]
  Flags: fast devsel, IRQ 255
  Memory at f6000000 (32-bit, non-prefetchable) [size=16M]
  Memory at e0000000 (64-bit, prefetchable) [size=256M]
  Memory at f0000000 (64-bit, prefetchable) [size=32M]
  I/O ports at e000 [size=128]
  Expansion ROM at f7000000 [disabled] [size=512K]
  Capabilities: [60] Power Management version 3
  Capabilities: [68] MSI: Enable- Count=1/1 Maskable- 64bit+
  Capabilities: [78] Express Legacy Endpoint, MSI 00
  Capabilities: [100] Virtual Channel
  Capabilities: [250] Latency Tolerance Reporting
  Capabilities: [128] Power Budgeting <?>
  Capabilities: [420] Advanced Error Reporting
  Capabilities: [600] Vendor Specific Information: ID=0001 Rev=1 Len=024 <?>
  Capabilities: [900] #19
  Kernel driver in use: vfio-pci
  Kernel modules: nvidiafb, nouveau

$ lspci -vs 01:00.1
01:00.1 Audio device: NVIDIA Corporation GP106 High Definition Audio Controller (rev a1)
  Subsystem: ZOTAC International (MCO) Ltd. GP106 High Definition Audio Controller
  Flags: fast devsel, IRQ 255
  Memory at f7080000 (32-bit, non-prefetchable) [disabled] [size=16K]
  Capabilities: [60] Power Management version 3
  Capabilities: [68] MSI: Enable- Count=1/1 Maskable- 64bit+
  Capabilities: [78] Express Endpoint, MSI 00
  Capabilities: [100] Advanced Error Reporting
  Kernel driver in use: vfio-pci
  Kernel modules: snd_hda_intel
Imaging the GPU ROM
Before you can image the GPU ROM, you need to make sure that you’ve successfully completed the prior steps to blacklist the GPU and that you’ve configured your motherboard to use another graphics device as the primary video output. This is important because the GPU needs to be uninitialized when it is imaged or the ROM file may be garbled from previous initializations.
For some graphics cards or other PCI-e devices, this step may be unnecessary. Some GPUs can operate just fine without mapping a static ROM file; the virtual machine can just directly access the device ROM. Your results may vary, though. The primary purpose of this step is to ensure that successive virtual machine reboots won’t require the hypervisor to be rebooted to reset the GPU’s ROM to an uninitialized state.
First, make sure that your hypervisor has been freshly rebooted so that your GPU’s ROM is uninitialized. Next, run the following commands (replacing the example BDF identifier with your device’s BDF identifier) to obtain an image of the GPU ROM:
$ export PCIE_BDF_IDENT='01:00.0'
$ echo 1 > /sys/bus/pci/devices/0000\:"${PCIE_BDF_IDENT}"/rom
$ cat /sys/bus/pci/devices/0000\:"${PCIE_BDF_IDENT}"/rom > \
    /usr/share/qemu/gpu-"$(date +%Y%m%dT%H%m%S)".rom
$ echo 0 > /sys/bus/pci/devices/0000\:"${PCIE_BDF_IDENT}"/rom
Note: The process of extracting your GPU’s ROM only needs to be done for the primary function of your device, i.e. the “graphics” portion of the device.
The GPU ROM is now available at /usr/share/qemu/gpu-YYYYMMDDTHHMMSS.rom for
use by libvirt and QEMU. You can name this file whatever you want for your own
convenience.
Preparing the Virtual Machine
Now that the hypervisor is prepared for GPU passthrough, we need to configure
the Windows® 10 virtual machine so that the GPU’s driver is unable to detect
the virtualization environment. For the purposes of this tutorial, we’ll be
using virsh to manually edit the virtual machine configuration. All of these
changes will remain intact, even if you use Virtual Machine Manager. (yay!)
Configuring the Virtual CPU
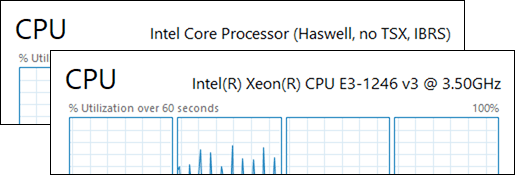
First, we must ensure that the virtual machine’s CPU model is set to
host-passthrough. It is very important that you understand the difference
between the “Copy host CPU configuration” checkbox and the host-passthrough
CPU model: The former picks a similar virtual CPU that simply covers the
feature set of the host CPU, where the latter configures QEMU’s virtual CPU to
directly masquerade as the host’s CPU model.
The below figure containing screenshots of Task Manager in the guest operating system demonstrates the difference between the two configurations:
Run virsh edit <machine> to edit the configuration of your virtual machine
(where <machine> is the name of your virtual machine’s libvirt profile). Find
the <cpu> node in the XML tree and edit the value of its mode attribute so
that it looks similar to the following line.
...
<cpu mode='host-passthrough' check='partial'>
  ...
Note: You may save the configuration and reboot after every modification to observe how it modifies the virtualization environment from your guest operating system’s perspective.
Hiding the Virtualization Environment
The first step to hide the virtualization environment is to disable the machine
specific registers relating to KVM paravirtualization. Add the following code
inside the <features> node of your virtual machine’s configuration using the
virsh edit <machine> command.
<kvm>
  <hidden state='on'/>
</kvm>
Next, select one of the following methods to try to defeat virtualization detection from the guest operating system. There are two methods that can be used to hide the virtualization environment in Windows® 10:
- Method A is the preferred method since it makes the virtualization
environment harder to detect in the guest operating system and provides great
performance if your CPU supports
constant_tsc. - Method B is an alternative that uses Hyper-V enlightenments for improved
performance on systems that don’t support
constant_tsc, but it may be easier to defeat via driver updates.
Note: Each method is mutually exclusive since Method B requires the hypervisor CPUID bit to be set so that Windows® will recognize and use the Hyper-V clock.
Open your virtual machine’s configuration for editing again by running
virsh edit <machine> and pick one of the following methods to follow. It is
recommended to reboot and perform benchmarks after each modification (where
permitted by applicable end-user license agreements) so that you may determine
which is the best performing configuration for your system.
Method A: Disabling the Hypervisor CPUID Bit
Inside the <cpu> block of your virtual machine’s configuration, add the
following line to disable the hypervisor CPUID bit.
<feature policy='disable' name='hypervisor'/>
This line should completely hide the virtualization environment from the perspective of the guest operating system, thus causing any virtualization check to pass.
Method B: Adjusting the Hyper-V Enlightenments
Inside the <features> node of your virtual machine’s configuration, make sure
that you have a <hyperv> node that looks similar to the below example. You may
use this example verbatim in your configuration.
<hyperv>
  <relaxed state='on'/>
  <vapic state='on'/>
  <spinlocks state='on' retries='8191'/>
  <vendor_id state='on' value='ahb6Wah2geeb'/>
</hyperv>
The <hyperv> node’s contents will ensure that Hyper-V enlightenments are
available to the guest operating system for higher performance. The vendor_id
tag overrides the default Hyper-V vendor ID to something unexpected by the
graphics drivers, causing them to successfully pass the virtualization check.
Next, inside the <clock> node of your virtual machine’s configuration, add the
following line to enable the Hyper-V clock.
<timer name='hypervclock' present='yes'/>
Attaching the GPU
At this point, the virtual machine should be capable of booting with attached PCI-e devices. The last step in this tutorial is to attach each passthrough device to the virtual machine and associate any ROM images (if applicable).
First, open the virtual machine for editing:
$ virsh edit <machine>
Next, add a <hostdev> section describing each passthrough device, declaring
the use of a ROM file if applicable:
<hostdev mode='subsystem' type='pci' managed='yes'>
  <rom file='/path/to/gpu-dump.rom'/>
  <source>
    <address domain='0x0000' bus='0x01' slot='0x00' function='0x0'/>
  </source>
</hostdev>
<hostdev mode='subsystem' type='pci' managed='yes'>
  <source>
    <address domain='0x0000' bus='0x01' slot='0x00' function='0x1'/>
  </source>
</hostdev>
Note: The slot attribute in the above snippets refer to the device section
of a BDF identifier. For most use-cases the domain attribute should remain
constant at 0x0000.
Finally, save the virtual machine configuration.
Booting the Virtual Machine
If everything is configured correctly, the virtual machine should now be able to boot and use the attached GPU without issue. All that remains now is the installation of the appropriate device drivers.
Conclusion
GPU passthrough with some vendors can be more difficult than others due to locked-down device drivers when running under virtualization. This tutorial demonstrates that with very careful configuration, virtualization detection in device drivers can be defeated, allowing such devices to be used without issue.
I hope that this tutorial was able to help guide you through the process of breaking out of the walled garden while following the best possible practices to maximize virtual environment preservation and maintainability.
This tutorial encourages feedback! If you notice any missing steps or information, or just find that the tutorial can be generally made better, please open an issue.
Glossary
BDF identifier—A system-specific
positional address of a PCI-e device. This identifier is used to select PCI-e
devices for passthrough. “BDF” represents the Bus:Device.Function notation
where each portion of the identifier consists of a zero-indexed, hexadecimal
value. The first two portions each contain two characters, while the last
portion contains only a single character. Example: 00:02.1 represents the
second function of the third device on the first bus.
hardware identifier—A non-unique
identifier corresponding to the manufacturer and model of a class of devices.
Commonly formatted as a 2-tuple of four-character hexadecimal identifiers
separated by a colon; the former represents the vendor and the latter represents
the model of the device. Example: 10de:1c03.
passthrough devices—A set of devices which are the target of PCI-e passthrough and each neighboring device within their respective IOMMU groups. This set should exclude any “PCI bridge” devices which are part of the CPU.